|
6.8.1. General requirements and
settings.
|
·
|
CD-RW or DVD-RW drives (cd or dvd "writers") are more
preferable in comparing with CD-ROM or DVD-ROM drives (cd or dvd
"readers"). |
|
·
|
You should uncheck the Detect
disc insertion by Windows box under the Browser tab in the Preferences dialog
before you will insert the troubled disc into the drive. |
6.8.2. Reading mini disc that
was finalized with failure on the camera.
Symptom.
The disc finalization was accidently interrupted, for example,
due to the power failure.
Troubleshooting.
|
·
|
Remove any disk(s) from your computer drive(s). |
|
·
|
Click the Preferences
button in the Tool Bar or select the same option from the View
menu. Make sure that the Detect
disc insertion by Windows is UNCHECKED on the Browser tab in
the Preferences dialog. Click the OK button to close the
Preferences. |
|
·
|
Insert the troubled disc. |
|
·
|
Click the Refresh button in the Tool Bar. |
|
·
|
Does the program recognize your disc? If not, please go to the
step 6.8.3 |
|
·
|
If you can see the disc icon in the program window, try to open
the disc by left-double clicking its name. Do you get the message
about unreadable root folder? If yes, try to run Scan UDF Disc from
the Tools menu and go to the step 6.8.4 if the program has found
the lost files. |
6.8.3. Reading non-finalized
(open) disc.
Symptom.
Disc was not finalized, you lost an access to the data due to
Disk Error. You was able to
view the photos earlier (prior to the disk error).
Troubleshooting.
|
·
|
Remove any disk(s) from your computer drive(s). |
|
·
|
Click the Preferences
button in the Tool Bar or select the same option from the View
menu. Make sure that the Detect
disc insertion by Windows box is UNCHECKED on the
Browser tab in the Preferences dialog. Click the OK button to close
the Preferences. |
|
·
|
Insert the troubled disc. |
|
·
|
Click the Preferences again. Select Sony Mavica (O) in the Forced scan list under the UDF reader tab. Click the OK button
and close the Preferences again. |
|
·
|
Click the Refresh button in the Tool Bar. If dialog with
Step 1. Specify your scan
area caption appears, try to find and recover the lost
photos step-by-step, using Wizard interface. Otherwise, the program
tries to find the lost files, scanning "UDF partition". Are any
files found? If yes, go to the step 6.8.4. |
|
·
|
Note. If some pictures look like corrupted, please try to
repeat the "forced scan" with the help of Sony Mavica CD. Also, this option is
recommended to find mavica videos (MPEG files). |
6.8.4. Recovering the found
(indexed) files displayed in the "Lost objects detected..."
window.
|
·
|
Apply Recover All / Recover
selected to retrieve the found files (photos)
automatically. |
|
·
|
Select file(s) and use Rename or/and New Extension commands to re-name the
indexed files to .jpg ones, and then copy them to HDD with the help
of Recover selected or
drag&drop operations. |
6.8.5. Viewing found
files.
To view the found photos (JPEG files), you can use View Image option. Just select a JPEG file
and click the View Image in
the Side Bar (left panel of the "Lost objects detected..."
window).
6.8.6. Burning the recovered
files.
To place the recovered photos onto new disc, click Burn button,
select Write files and folders
onto data disc in the Start Window and click the Next
button.
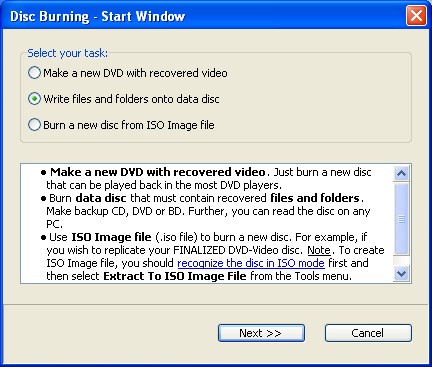
Further, using a simple "step by step" procedure, you can select
a burner (computer drive), add the recovered files (photos) into
your compilation and, finally, burn a new disc.
|